
The cake filler is a commonly used automated device for filling cakes during baking processes. After prolonged use, residues such as batter, cream, and fillings can easily accumulate inside the hopper, discharge ports, and filling molds. If these components are not cleaned promptly, it can lead to various problems.Material discharge is blocked, the amount of material discharged is uneven, the filling quality deteriorates, and the machine becomes sluggish during operation.and other questions.
Many novice users don’t know how to disassemble devices properly. They are too afraid to remove the components from the device, which results in the device becoming more and more inefficient over time, and reducing its lifespan. Below, we’ll provide some real-life videos of how to disassemble devices correctly.The most standardized, simplest, and least complicated step-by-step instructions for disassembling the cake filler device.Remove the components in the order specified by the fixing screws. Ensure that the machine is not damaged, and that the components are installed correctly.
1. Precautions during disassembly
1.deviceComplete power off and shutdown of the systemMake sure the motor is not running, and the aircraft is not energized.
2.Empty the remaining filling in the hopper to prevent the filling from spilling during disassembly.
3.Prepare the storage boxes and organize nuts and accessories in appropriate categories to prevent loss.
4.whole processNo need for violent dismantlingAll accessories and screws are standardized, making them easy to install and remove.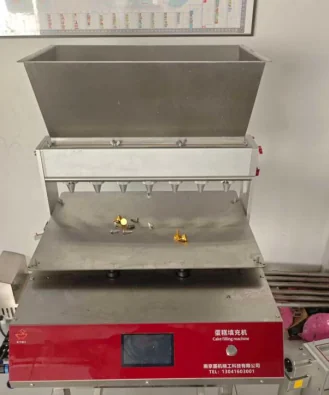
II. Standard disassembly procedure for cake filling machines (video-guided steps)
Step 1: Disassemble the hopper assembly (remove it from the device)8A fixed nut
The hopper of the cake filler is connected to the machine.surrounding8A single nutFixed on the main body of the host, located at both the front and rear.4The nuts are evenly distributed throughout the object.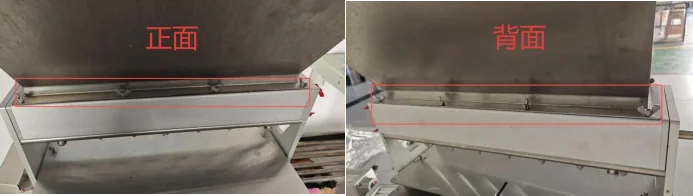
Loosen all the screws around the hopper, one by one.8After removing the nut, the entire hopper can be easily separated from the machine’s main body.
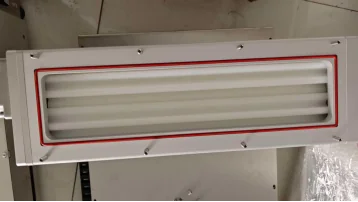
After removing the hopper, it is possible to clean the interior separately, and remove any dried dough or remaining fillings.
Step 2: Remove the component on the right side of the fuselage.4A red, fixed-sized nut
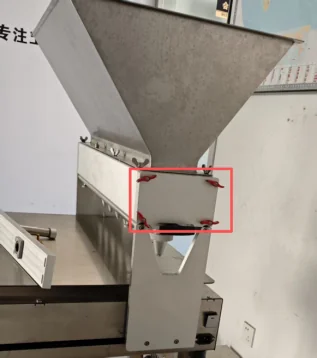
After removing the hopper, locate the area on the right side of the machine’s discharge structure, and remove it accordingly.4A red, fixed-sized nut。
These four red nuts are used to secure the position of the discharge component. Once removed, the discharge part can be disassembled.
Step 3: Disassembling the outer ring of the discharge component6Silver-colored nut
After removing the red nut, continue with the disassembly process.peripheral to the discharge port6Silver-colored fixing nut。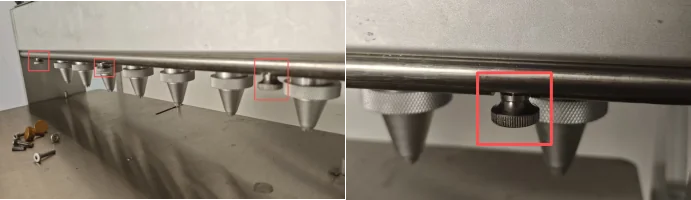
6After all the silver nuts have been unscrewed, the entire output core component can be completely separated from the main unit.
Step 4: Disassembling the discharge nozzle mold8A golden nut
After removing the material discharge component separately, the last step is to dismantle it.fixed-discharge-nozzle molds8A golden nut。
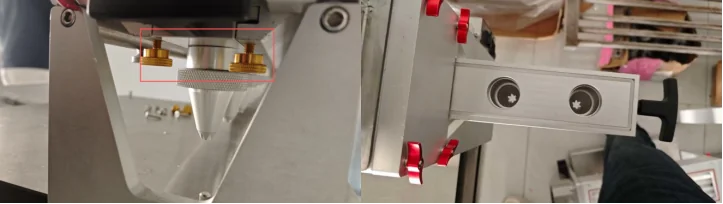
After the golden nut is removed, the nozzle mold at the front end can be easily pulled out.
III. The entire machine has been disassembled successfully.
Up to this point,The complete set of core components for the cake filler: hopper, discharge assembly, and discharge nozzle molds have all been removed.。
The entire disassembly process involves a well-organized distribution of screws, with each area being clearly defined:
Chute:8A ordinary nut
Right side of the fuselage:4A red nut
Outer ring of the material outlet:6Silver-colored nut
Mold fixation:8A golden nut
It’s not easy to confuse the screw types during the disassembly process. After cleaning is completed,Just reinstall the components in the reverse order of disassembly.。
IV. Recommendations for Disassembly, Cleaning, and Maintenance
1.All removed hoppers, pipelines, and discharge nozzles are cleaned with warm water.
2.Clean the dry paste and residues inside the holes, ensuring that the discharge holes are unobstructed.
3.Dry all components thoroughly to prevent bacteria from growing due to moisture.
4.Before installation, check that the nuts and threads are in good condition to prevent slipping.
5.After reinstalling the component, perform a no-load test to ensure that the material is discharged smoothly, without any shaking or leakage.
V. The Benefits of Regular Equipment Maintenance
completely solveSilencing, cutting off supplies, uneven distribution of materialsproblem
Complies with food processing hygiene standards; the filling does not remain residual or deteriorate over time.
Reduces machine stuttering and unstable performance issues.
Extends the lifespan of the cake filling machine
demo video
